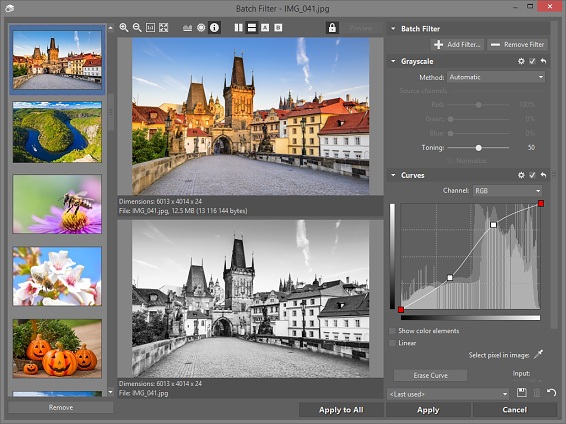
Zoner displays most editing functions in one single interface, that is, one single way of presenting controls to you. This interface is presented in one of two fundamentally-different ways, depending on which of the program's modules (main parts) you are using when you access a function. When you access it from the Manager, this interface is shown via a window. When you access it from the Editor, the interface "loses" its preview areas (your changes are previewed right inside the picture), and it is displayed in the Side Panel.

The Filter Window in the Browser
The top part of the window contains a toolbar with buttons for changing the preview's zoom level and for showing/hiding a histogram, over/underexposure ("blowout") highlighting, and file information, as well as for changing the preview layout. Histogram displays can be moved around freely within previews.
Image previews occupy most of the filter window. By default, both "before" and "after" previews are displayed side by side, but you can also choose a vertical layout, or hide the "before" or "after" preview. Click the mouse wheel to temporarily show the contents of one preview within the other preview.
When a picture's preview is zoomed in far enough that it does not fit inside its preview pane, click and drag it to set which part of it is shown. The sizes of the preview panes change depending on the size of the window. That is, resizing the window also resizes the previews.
When a filter window includes one or more eyedropper buttons, you can click an eyedropper button and then select a color from inside a preview.
If slow refreshing of the previews is slowing down your work, then turn off Automatic Preview (using the "lock" button) and then manually refresh preview panes as needed by clicking Preview. The "Outdated Preview" text displayed over a preview pane with a "stale" preview disappears as soon as you do a manual refresh.
When you leave any filter window, its size is stored, as well as the settings for blowout and histogram display and for Automatic Preview. Thus the "universal" parts of the window will look the same on your next visit. The remaining settings are stored separately for each editing filter.
Using Filters from the Editor
The Editor automatically previews the results of editing filters you use, right inside the picture. In this previewing mode, the Editor is partially blocked—you can only resize the Editor, change its display (the zoom level and blowout and histogram displays), and edit the selection mask.
All of a given filter's options are shown in the Side Panel. The bottom of the Panel contains Apply and Cancel buttons. Click these to make the filter's effect permanent, or to cancel out of it. Click the button next to these two to quickly show how the picture looks without the filter.
Batch Operations
During batch operations (editing of more than one file at a time), the filter window contains a column on the left with thumbnails for all of the files that the edit will affect. You can browse among these thumbnails so as to "test" how the edit in question affects them. To remove a picture from the list of pictures to process, click its thumbnail and then click Remove. To apply an edit to the active picture only, click Apply. To apply it to all pictures in the batch, click Apply to All. Click Cancel to cancel the whole batch operation.
Saving Filter Settings as Presets
You can save the settings for any filter as a preset with a name of your choice and later reload that preset (that set of settings). Additionally, whenever you apply an edit, the settings you use are automatically saved to a preset named <Last used>. The settings stored in the <Last used> preset are automatically loaded in the next time you use the given editing window. Use Save Preset and Delete to create and manage presets. You can have as many as you wish. Click Default Preset to quickly load the preset named <Default>, which contains the given filter's "factory settings."
To import and export presets, visit Settings | Presets Manager…
![]()