March 2022 – The “Backup of Original” feature was removed completely. It is no longer be possible to automatically restore these backups in ZPS X.
Reasons:
The “Backup of Original” feature was removed as an outdated function that was holding back the further development of ZPS X. The removed feature can be replaced using appropriate methods and mechanisms that have been available in ZPS X for a long time.
What Does This Mean for Me?
- If you are using this feature for short-term backups, you don’t need to do anything. We recommend adjusting your work methods to avoid losing your valuable data in the future. You can find a few tips in our Recommendations for safe work with files in ZPS X.
- If you are using the Backup of Original feature for long-term backups, and you do not want to lose your photos, we recommend copying the backups Repository (C:\Users\user.name\AppData\Local\Zoner\OriginalsRepository by default) to another place on disk. You can extract the photos’ originals using display filtering and batch renaming. Detailed instructions are available in a guide we’ve prepared for you. Be sure to also read our Recommendations for safe work with files in ZPS X
Recommendations for Safe Work with Files in ZPS X
- Use Make Backup Copy in the options for the Import function in place of Backup of Original. That way you will always have a backup of your imported photos at hand.
- For basic photo editing, use the Develop module, which works non-destructively by default. (it does not change the photo’s original).
- Export your photos to a new folder. You can use presets such as JPEG – Archival Quality during this.
- When making batch edits in the Manager using Batch Filter (Ctrl + Q), always do this work on copies you’ve created in advance.
- When working in the Editor, save your changes using Save As so as to create a new copy of the file with a new name or in a new place.
Backup of Original – Restoring Files (Feature Available until March 2022)
The first time a photo is changed (e.g. resized, rotated, or even rated), Zoner Photo Studio automatically creates a backup of the photo’s original version.
If a photo has this backup of its original version, and it has been inadvertently changed and lowered in quality, you can restore it from this backup file. These unchanged files are called backups of originals.
Backups of originals are not visible in the Browser as files. Where a backup exists for the original version of a photo, an arrow icon is shown on its thumbnail. Double-click this icon to restore it to its original version. Right-click this icon to call up a menu; use this menu to restore from the backup or delete the backup. The Backup of Original feature can also be accessed from the program’s main menu, via Organize | Backup of Original….
These backups are stored in a special folder – the Repository. By default, backups are stored in this location: C:\Users\user.name\AppData\Local\Zoner\OriginalsRepository
.
Instructions for Manually Converting Backups of Originals into Photos
- Launch ZPS X, and in the Preferences, go to Display and turn on Show all files.
- In the Filter Windows section of the Preferences, turn on Allow batch renaming for all file types.
- Find the folder for backups of originals (C:\Users\user.name\AppData\Local\Zoner\OriginalsRepository by default). We recommend first creating a copy of this folder and thus working on copies of the files, in case of e.g. a mistake during renaming.
- For each photo, this folder contains two files with the same name but different endings, for example: 00001.jpg.info, 00001.jpg.original
– The .info files contain information on the photo’s original name and location, and they can be opened in the Windows Notepad
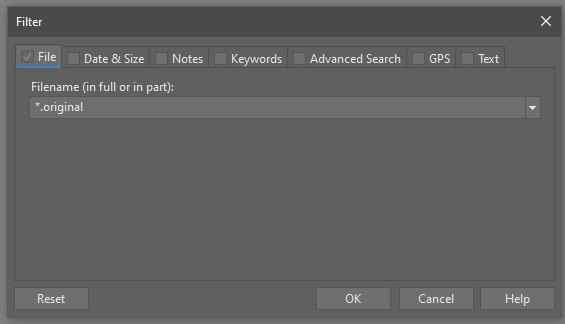
– the .original files are your photos, which you now need to get into the right format. - In the top left menu of the Manager, go to Organize, then Filter…. Leave just the File tab checkmarked. In the File textbox, enter *.original (see image)
- The Browser now shows only files whose names have the .original filename extension.
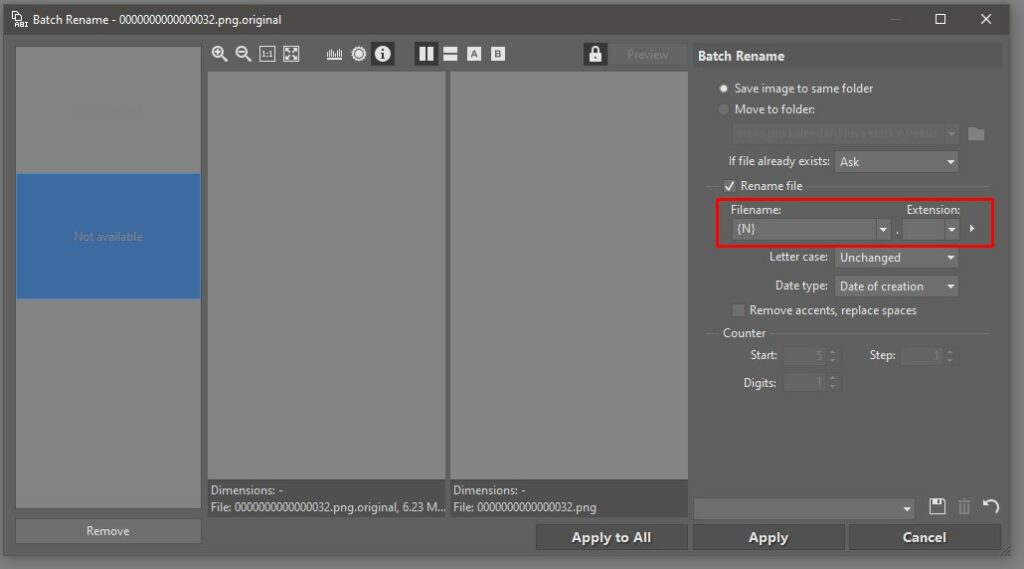
- Select all files (Ctrl + A) and use Batch Rename (Ctrl + Shift +Q).
- WARNING! To use this method correctly, the filename box needs to contain only “{N}”. The filename extension box must not contain any text! (see image)